Most concrete contractors will take on a job with strict restrictions and specifications at least once in their careers. When it comes to pouring the concrete slab under an ice rink, those restrictions and specifications are plenty. But Bravo Cement Contracting Inc. is always up for the challenge.
The Windsor, Ontario, company has installed about 20 ice rink slabs over the last five years, says third generation owner Paul Bravo. "A lot of federal and provincial stimulus money is being put toward these arenas, and a lot of older complexes are getting replaced," he says.
Ice rink slabs hold several challenges for contractors. Cooling lines within the slab mean contractors can't drive heavy equipment over the jobsite during placing and strikeoff processes. Contractors also have to avoid placing tools with jagged edges to prevent the potential of puncturing the cooling lines. And ice rink slabs demand tight floor flatness and floor levelness specifications due to the importance of a flat ice surface. Deviations in the flatness of the concrete will be reflected on the ice surface and can affect the people skating on the ice.
Bravo on the job
 Bravo Cement places plywood on the floor so they can pump concrete while stationing the truck off of the working area.Bravo Cement Contracting Inc.
Prior to the placement of the new slab, Bravo met with the general contractor, engineer and owner representative. Bravo suggested modifying the concrete mix design with less portland cement to prevent shrinkage. The new mix design was a 3,500 psi concrete with 815 pounds per cubic yard total cementitous content using 25 percent slag and a blend of 3/8- and 3/4-inch aggregate. An initial slump of 3 inches was agreed upon with the addition of super-plasticizer for an ultimate slump of 6 inches at point of placement, Bravo says. Bravo also convinced the group to increase the concrete thickness over the top reinforcement to 11/2 inches and to tighten up the chair spacing to 18 inches on center to eliminate deflection of the cooling lines during concrete placement.
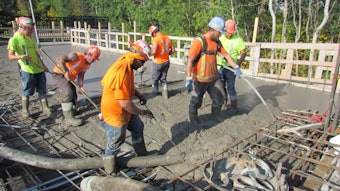
Bravo Cement stationed its equipment at the back of the rink allowing them to pour the concrete without surrounding the equipment or getting trapped with no exit route. The company placed a layer of 3/4-inch plywood in the center of the rink so the pump hose would not damage the cooling lines.
It took about six hours to pour the 17,000-square-foot, 5-inch-thick slab, Bravo says. They pumped the slab in 16-foot-wide strips moving across the shortest distance of the rink to prevent cold joints, Bravo says.
Once pumped, the perimeter edge was vibrated with a small pencil vibrator. "We only vibrate the perimeter because the cooling lines are very closely spaced. The equipment that we use to screed the floor has its own internal vibrating system and that is sufficient for consolidating the concrete around the cooling lines," he says. "If the slab is over vibrated it will cause the cooling lines and reinforcement to float toward the surface, which is a disaster."
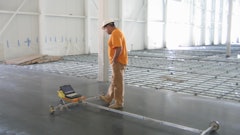
After the concrete was pumped, Bravo used a Somero PowerRake to level the concrete to within a ¼ inch of the final elevation. Then crews passed over the slab with a Somero CopperHead laser-guided screed to achieve the final grade. Bravo fitted each unit with flotation tires to level and screed the concrete to the rigid FF and FL requirements.
After screeding, the slab was floated with a 12-foot bullfloat followed by a 12-foot highway straightedge. At that point Bravo used a manual laser to double check slab elevations. The process was repeated until the slab reached the specified flatness. "Floor tolerance of ice rinks is very critical with no room for error," Bravo says. Most ice rinks will require either a 1/8-inch in 10-foot flatness requirement or overall F-numbers of FF 30, FL 25, he adds. "We always meet the specified tolerances and normally exceed them substantially. In this case we achieved an FF 60 and FL 50," he says.
For the initial slab floating, Bravo used a Whiteman 48-inch walk-behind trowel fitted with float shoes. Crews followed that with a manually operated double trowel with float shoes. Next, crews applied the first coat of floor hardener and passed the highway straightedge. A 10-foot hydrostatic ride-on double trowel with float pans was used to incorporate the hardener into the slab prior to applying a second coat of floor hardener. The second coat was straightedged and floated again with the double trowel machine. The floor was then panned several times in different directions until it was ready to be troweled. Bravo used an 8-foot hydrostatic double trowel for the first two trowel passes and then finished with two passes using an 8-foot manually controlled double trowel. The floor achieved a dense burnished finish.
An independent testing agency tested the slab for flatness and levelness before it was flooded with water. Bravo covered the flooded slab with poly and let it stay submerged for seven days. "The wet cure allows the slab to gain strength prior to excessive amounts of shrinkage occurring," Bravo points out. At the end of the seven days, Bravo returned with an auto scrubber to clean up any remaining water on the slab. Finally, an independent testing firm came to ensure the ice rink was at the correct flatness.
With the right specifications, concrete mix and equipment Bravo Cement was able to repair the ice rink's slab in just nine days.


